You step into the shower, turn on the water — and the moment someone flushes the toilet down the hall, your shower drops to a weak trickle. Sound familiar?
Low water pressure after flushing a toilet is one of the most common plumbing complaints in American homes. It’s frustrating, it’s disruptive, and most homeowners assume it’s just “how old houses work.”
It’s not. And you don’t have to live with it.
In the majority of cases, the root cause is a failing or incorrectly set pressure regulating valve (PRV) — a small brass device that controls water pressure for your entire home. The good news is that fixing it is a straightforward DIY repair that can restore full, consistent water pressure throughout your home in a single afternoon.
This complete guide walks you through exactly how to diagnose the problem, adjust or replace your PRV, and put an end to pressure drops for good.
What Causes Low Water Pressure After Flushing a Toilet?
Understanding why this happens helps you fix it faster.
When a toilet flushes, the tank needs to refill quickly — drawing a significant surge of water in a short amount of time. In a properly pressurized home, this demand is handled smoothly and barely noticed at other fixtures.
But if your home’s water pressure is already running low or borderline, that sudden demand pulls noticeable pressure away from everything else running simultaneously — your shower, kitchen faucet, or washing machine.
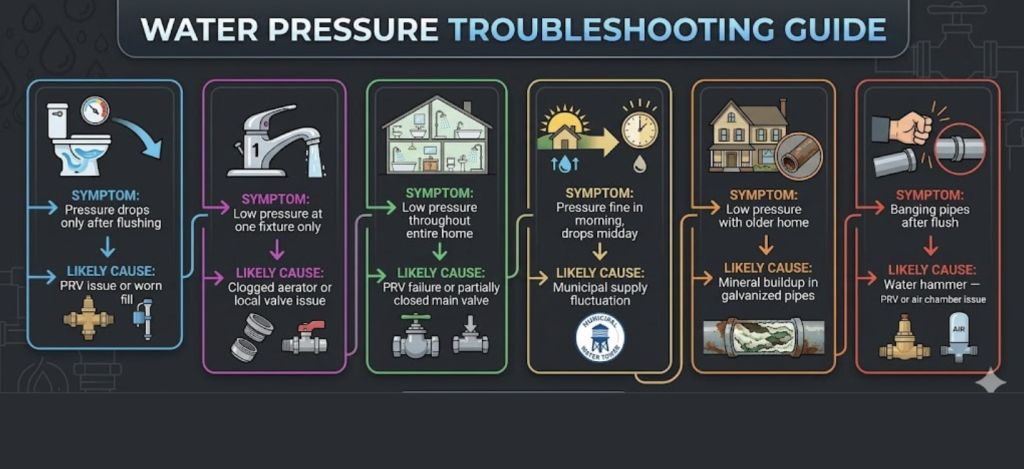
The most common causes of pressure drop after flushing include:
- Failing or misadjusted pressure regulating valve (PRV) — The #1 cause in most homes
- Partially closed main shut-off valve — Restricting total water flow into the home
- Worn toilet fill valve — Drawing excess water during tank refill
- Mineral buildup in pipes — Narrowing pipe interiors and reducing flow capacity
- Undersized supply lines — Unable to handle simultaneous fixture demand
- Municipal supply pressure fluctuations — Dropping during peak usage hours
Of all these causes, the PRV is the most impactful and the most overlooked — and it’s where your diagnosis should always begin.
What Is a Pressure Regulating Valve — and Why Does It Fail?
A pressure regulating valve (PRV) is a bell-shaped brass fitting installed on your main water supply line where it enters your home. Its job is to reduce the high incoming pressure from the municipal supply — which can run anywhere from 80 to 150 psi — down to a safe, consistent level for your home’s plumbing, ideally between 45 and 80 psi.
Most homes built after the 1970s have one as standard equipment. Without it, that high street pressure would damage your pipes, fixtures, and appliances over time.
Why PRVs fail:
Over time, the internal components of a PRV — springs, seats, and diaphragms — wear out and lose their ability to maintain consistent pressure. Mineral deposits from hard water accelerate this process. A failing PRV can get stuck in a partially closed position (causing low pressure) or fail in the open position (causing damaging over-pressure).
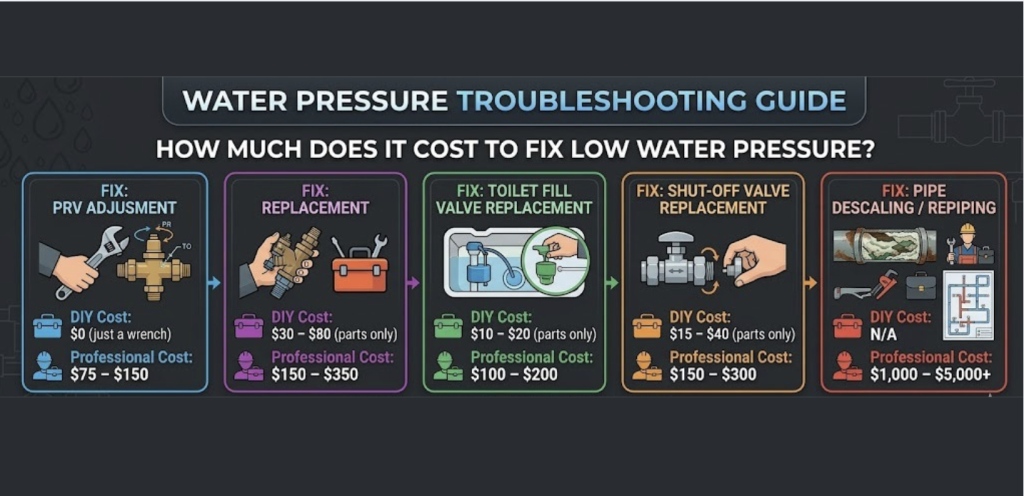
Average PRV lifespan: 10 to 15 years. If yours is older than that, it may be time to replace it regardless of symptoms.
How to Diagnose a Failing Pressure Regulator
Test 1 — Measure Your Water Pressure
The fastest way to confirm a PRV problem is with a simple pressure gauge test.
- Buy a water pressure gauge from any hardware store ($10 – $15) — it threads onto any standard hose bib
- Attach it to an outdoor spigot or laundry room faucet
- Turn the faucet fully on and read the gauge
- Have someone flush a toilet and watch how far the pressure drops
Test 2 — Visual Inspection of the PRV
Locate your PRV — it’s typically found near your main shut-off valve in the basement, utility room, or crawl space. Look for:
- Visible corrosion or mineral buildup on the valve body
- Moisture or dripping around the valve
- Age — if it’s over 10 years old and causing symptoms, replacement is worth considering
Step-by-Step: How to Fix Low Water Pressure After Flushing
Step 2: Adjust the PRV Setting
Before replacing anything, try a simple adjustment. Many pressure problems are caused by a PRV that has drifted out of its correct setting over years of use — and this fix costs nothing.
How to adjust:
- Loosen the locking nut on top of the PRV (counterclockwise)
- Turn the adjustment screw clockwise to increase pressure
- Turn the adjustment screw counterclockwise to decrease pressure
- Make quarter-turn adjustments only — small changes have a big effect
- Check your pressure gauge after each adjustment
- Target 55 to 65 psi for optimal whole-home pressure
- Tighten the locking nut once you reach your target pressure
Retest by running a faucet and flushing the toilet simultaneously. If pressure holds steady, you’re done.
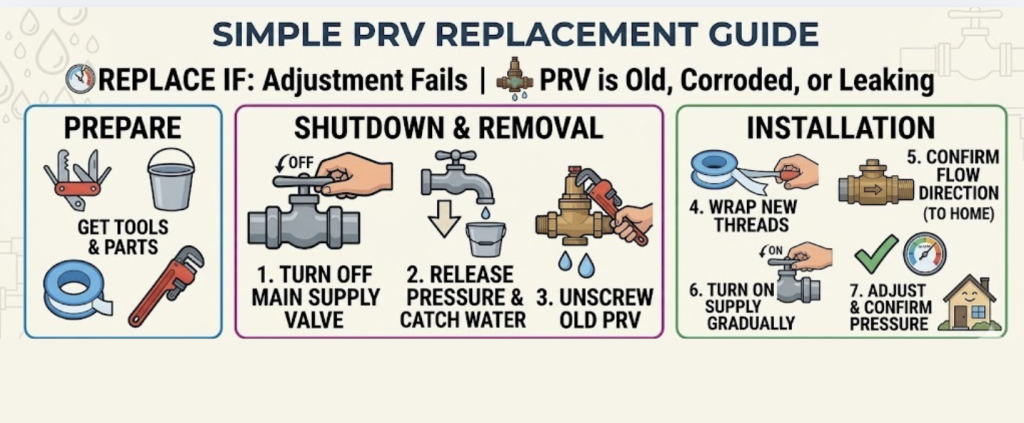
Step 3: Replace the PRV If Adjustment Fails
If adjusting doesn’t bring pressure into range — or if the PRV is corroded, leaking, or over 10 years old — replacement is the right move.
What you’ll need:
- Replacement PRV (match size: typically ¾” or 1″) — $30 to $80
- Pipe wrench and adjustable wrench
- Teflon tape
- Bucket and towels
How to replace:
- Shut off the main water supply valve completely
- Open a faucet on the lowest floor to release residual pressure
- Place a bucket under the PRV to catch remaining water
- Unscrew the old PRV using a pipe wrench
- Wrap new PRV threads with 3 to 4 layers of Teflon tape
- Thread the new PRV onto the supply line — hand tight first, then snug with the wrench
- Confirm the flow direction arrow on the PRV body points toward the home
- Slowly turn the main supply back on
- Check all connections for leaks
- Adjust the new PRV to 55 – 65 psi using your pressure gauge
Step 4: Check the Toilet Fill Valve
Any drain that goes unused for several weeks — guest bathroom sinks, floor drains, utility room sinks — can dry out its P-trap seal and allow sewer gas into your home. Before summer guests arrive, run every tap for 30 seconds and pour a cup of water into every floor drain to restore the barrier.
Step 5: Check All Shut-Off Valves
Walk through your home and confirm that every shut-off valve — especially the main shut-off and any branch valves under sinks or behind appliances — is fully open. A valve even slightly turned restricts flow significantly and contributes to pressure drops under demand.
Step 6: Test the Full System
Run your final confirmation test:
- Check static pressure — confirm 55 to 65 psi on your gauge
- Turn on the shower and flush a toilet simultaneously
- Run the kitchen faucet while the washing machine fills
- Inspect PRV connections for any drips
- Recheck pressure after 24 hours to confirm the PRV holds its setting
Consistent pressure across simultaneous demands means your repair is complete and successful.
Low Water Pressure vs. Whole House Low Pressure: Know the Difference
Not all low pressure problems have the same cause. Here’s how to tell them apart:
How Much Does It Cost to Fix Low Water Pressure?
When to Call a Licensed Plumber
Consider calling a professional if:
- You cannot locate your PRV or your home doesn’t appear to have one
- The PRV is heavily corroded or threads are damaged beyond hand removal
- Pressure remains above 80 psi after adjustment — sustained over-pressure damages pipes and appliances
- The main shut-off valve also needs replacement
- You suspect a municipal supply issue requiring utility company involvement
- Repiping is needed due to severe mineral buildup in older galvanized pipes
FAQs
Why does my water pressure drop every time I flush the toilet?
When a toilet flushes, the tank refill draws a sudden surge of water. If your home’s pressure is already low or your PRV is failing, that demand pulls noticeable pressure away from other running fixtures. Adjusting or replacing the PRV typically solves this completely.
What is the ideal water pressure for a residential home?
The recommended range is 45 to 80 psi, with most plumbers targeting 55 to 65 psi as the ideal sweet spot — strong enough for good flow everywhere, low enough to protect pipes and appliances from long-term stress.
How do I find my pressure regulating valve?
Look near your main water shut-off valve — typically in the basement, utility room, crawl space, or garage where the main supply line enters your home. It’s a bell-shaped brass fitting with an adjustment screw or bolt on top.
Can I adjust the pressure regulator myself?
Yes — it’s a simple DIY task. Loosen the locking nut, turn the adjustment screw clockwise to raise pressure or counterclockwise to lower it, and check your pressure gauge after each quarter turn until you reach 55 to 65 psi.