
A running toilet is more than an annoyance. It wastes hundreds of gallons of water daily and quietly inflates your water bill every month. The good news? A running toilet fix is one of the easiest DIY repairs a homeowner can do. Most fixes cost under $20 and take less than 30 minutes.
This guide walks you through every cause, every fix, and when to call a professional.
What a Running Toilet Is Actually Costing You
A moderate toilet leak wastes 200–250 gallons of water per day. That adds $70–$100 to your monthly water bill. Left unaddressed for several months, a single running toilet can cost over $1,000 in wasted water annually.
Silent leaks are the sneakiest problem. Water seeps from the tank into the bowl without any sound. Your water meter keeps spinning, but you hear nothing. The dye test below will catch it.
Understanding What’s Inside Your Tank
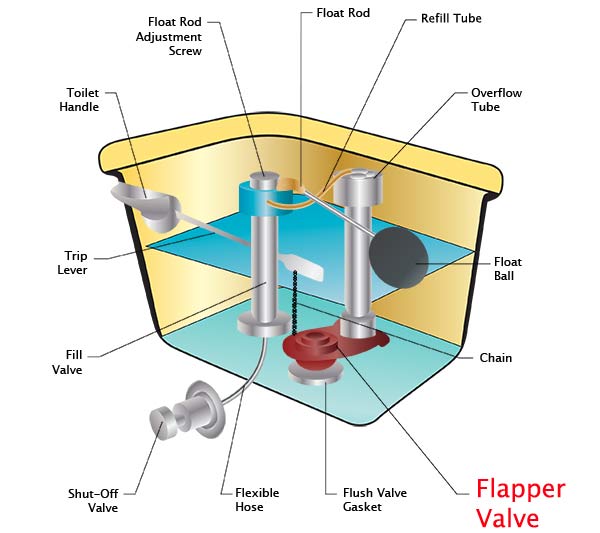
Before attempting any running toilet fix, know the five key components:
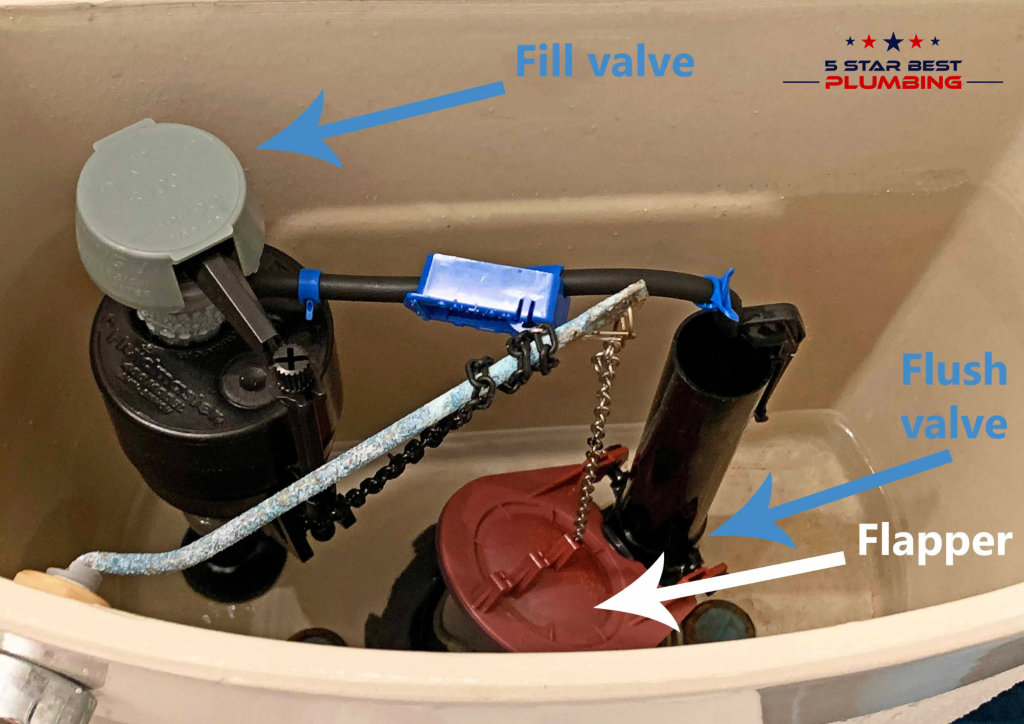
Flapper — A rubber seal at the tank bottom. It lifts during a flush and reseals afterward. When worn or warped, it leaks water continuously into the bowl.
Fill Valve — Controls water entering the tank after a flush. When faulty or clogged with mineral deposits, it fails to shut off.
Float — Rises with the water level and signals the fill valve to stop. If set too high, water spills into the overflow tube and the valve never shuts off.
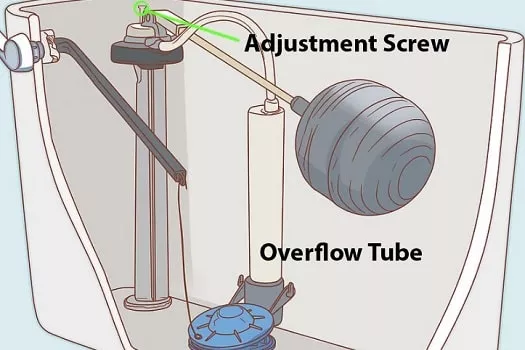
Overflow Tube — A vertical tube that prevents the tank from flooding. Water should sit one inch below its top. If water reaches the tube, it drains into the bowl constantly.
Flapper Chain — Connects the handle to the flapper. Too tight and it holds the flapper open. Too loose and it gets trapped under the flapper, breaking the seal.
Step 1: Diagnose Before You Buy Anything
The Dye Test Drop food coloring into the tank. Do not flush. Wait 15 minutes. If color appears in the bowl, the flapper is leaking. If the bowl stays clear, the problem is the float or fill valve.
Check the Water Level Look at the water level inside the tank. It should sit one inch below the top of the overflow tube. Water at or above that level means the float is set too high.
Test the Fill Valve After flushing, manually lift the float arm upward. If the running stops, the fill valve is fine — the float just needs adjusting. If water keeps running with the float fully raised, the fill valve needs to be replaced.
Check the Handle and Chain Press the flush handle and release it. If it sticks or doesn’t spring back, it may be holding the chain taut and keeping the flapper slightly open. Also check that the chain has about half an inch of slack when the flapper is closed.
Step 2: Replace a Worn Flapper
This is the most common running toilet fix. If the dye test showed leaking, start here.
- Turn the shut-off valve clockwise to stop water flow.
- Flush to empty the tank. Sponge out remaining water.
- Unhook the chain from the flush arm.
- Slide the flapper ears off the side pegs and remove it.
- Take the old flapper to the hardware store to match the size. Most toilets use a 2-inch flapper. Newer high-efficiency models use a 3-inch version.
- Snap the new flapper onto the side pegs. Reattach the chain with half an inch of slack.
- Turn the water back on and repeat the dye test to confirm the leak is resolved.
Step 3: Adjust the Float
If the water level was too high, lower the float so water stops one inch below the overflow tube.
Ball float (older toilets): Gently bend the float arm downward. This lowers the shutoff point.
Cup or cylinder float (modern toilets): Find the adjustment screw on the fill valve. Turn it clockwise to lower the water level. Alternatively, pinch the clip on the float shaft and slide it down.
Flush and confirm the water stops at the correct level.
Step 4: Clean or Replace the Fill Valve
If adjusting the float didn’t help and the valve still runs with the float raised, address the fill valve.
To clear debris: Hold a cup upside down over the open fill valve. Slowly turn the water supply back on. The pressure burst flushes sediment out into the cup. Turn water off, clean the valve cap, replace it, and test.
To replace the fill valve:
- Turn off the water and empty the tank.
- Place a bucket under the tank. Disconnect the supply line from the bottom.
- Unscrew the plastic nut holding the fill valve to the tank floor.
- Lift the old valve straight out.
- Insert the new valve. A universal fill valve costs $10–$15 and fits most toilets.
- Set the water level mark on the valve shaft half an inch below the overflow tube top.
- Reconnect the supply line and fill tube. Restore water and test.
Common Mistakes That Make Things Worse
Using bleach tank tablets. Bleach degrades rubber flappers, O-rings, and fill valve seals within months. This is one of the most common hidden causes of recurring running toilet problems. Switch to enzyme-based tablets or clean manually.
Buying the wrong flapper size. A 2-inch flapper on a 3-inch valve will never seal. Always match the old part before purchasing.
Ignoring the flush valve seat. Even a new flapper won’t seal on a seat coated in mineral deposits. Run your finger around the seat. If it feels rough or gritty, clean it with white vinegar and a toothbrush before installing the new flapper.
When to Call a Professional
Some problems go beyond DIY repair. Call a licensed plumber if:
- Water is pooling at the base of the toilet
- The toilet rocks or wobbles
- You’ve replaced the flapper and fill valve and it still runs
- You hear grinding or whistling from the tank
- Your toilet is tankless, wall-mounted, or pressure-assisted
Final Thoughts
A running toilet fix is fast, inexpensive, and completely achievable without prior plumbing experience. Start with the dye test, follow the steps in order, and in most cases you’ll have a silent, efficient toilet within the hour.
If you’ve worked through every step and the problem persists, don’t wait. Water damage escalates quickly.
FAQs
What is the most common cause of a running toilet?
A worn or warped flapper is the number one cause. Over time, the rubber seal deteriorates and can no longer create a tight seal at the bottom of the tank. Water continuously leaks into the bowl, causing the fill valve to keep running.
How do I know if my flapper needs replacing?
Do the dye test. Drop food coloring into the tank and wait 15 minutes without flushing. If color appears in the bowl, your flapper is leaking and needs to be replaced. You can also visually inspect it — cracks, warping, or chunks peeling away are clear signs of failure.
What size flapper does my toilet need?
Most standard toilets use a 2-inch flapper. Many newer high-efficiency and low-flow toilets require a 3-inch flapper. The safest approach is to remove the old flapper and take it to the hardware store to match it exactly before buying a replacement.
Can bleach tablets cause a running toilet?
Yes. Bleach-based tank cleaning tablets are highly corrosive to rubber components. They can deteriorate the flapper, O-rings, and fill valve seals within six months, causing repeated running toilet problems. Switch to enzyme-based tablets or clean manually instead.
My toilet refills on its own every hour. What is causing that?
That is called a phantom flush. A slow, silent flapper leak gradually empties the tank. When the water level drops low enough, the fill valve kicks on to refill it. The cycle repeats every hour or so. Replace the flapper and repeat the dye test to confirm the leak is resolved.

